maven的使用
阅读数:192 评论数:0
跳转到新版页面分类
工程管理
正文
一、pom.xml
maven将项目抽象成一个模型,pom.xml为项目模型对象的描述文件。
1、maven模型版本,对于maven2-3,4.0.0基本稳定。
<modelVersion>4.0.0</modelVersion>groupId、artifactId, version必须,这里的version可以用区间表示。
<groupId>项目所属组织</groupId>
<artifactId>项目或模块名称</artifactId>
<version>项目版本</version>
version中有snapshot表示此版本将频繁更新,不稳定。
<build>
  	<plugins>
        <!-- 指定编译插件 -->
  		<plugin>
  			<groupId>org.apache.maven.plugins</groupId>
  			<artifactId>maven-compiler-plugin</artifactId>
            <!-- 设置编译插件信息 -->
  			<configuration>
                <!-- 编译时的jdk版本-->
  				<source>1.8</source>
                <!-- 运行时的jdk版本-->
  				<target>1.8</target>
  				<encoding>UTF-8</encoding>
  			</configuration>
  		</plugin>
  	</plugins>
</build> <!--------------------- 路径管理(在遵循约定大于配置原则下,不需要配置) --------------------->
<!--项目源码目录,当构建项目的时候,构建系统会编译目录里的源码。该路径是相对于pom.xml的相对路径。 -->
<sourceDirectory />
<!--该元素设置了项目单元测试使用的源码目录。该路径是相对于pom.xml的相对路径 -->
<testSourceDirectory />
<!--被编译过的应用程序class文件存放的目录。 -->
<outputDirectory />
<!--被编译过的测试class文件存放的目录。 -->
<testOutputDirectory />
<!--项目脚本源码目录,该目录下的内容,会直接被拷贝到输出目录,因为脚本是被解释的,而不是被编译的 -->
<scriptSourceDirectory /> <!--------------------- 资源管理 --------------------->
<!--这个元素描述了项目相关的所有资源路径列表,例如和项目相关的属性文件,这些资源被包含在最终的打包文件里。 -->
<resources>
<!--这个元素描述了项目相关或测试相关的所有资源路径 -->
<resource>
<!-- 描述了资源的目标输出路径。该路径是相对于target/classes的路径 -->
<!-- 如果是想要把资源直接放在target/classes下,不需要配置该元素 -->
<targetPath />
<!--是否使用参数值代替参数名。参数值取自文件里配置的属性,文件在filters元素里列出 -->
<filtering />
<!--描述打包前的资源存放的目录,该路径相对POM路径 -->
<directory />
<!--包含的模式列表,例如**/*.xml,只有符合条件的资源文件才会在打包的时候被放入到输出路径中 -->
<includes />
<!--排除的模式列表,例如**/*.xml,符合的资源文件不会在打包的时候会被过滤掉 -->
<excludes />
</resource>
</resources>
<!--这个元素描述了单元测试相关的所有资源路径,例如和单元测试相关的属性文件。 -->
<testResources>
<!--这个元素描述了测试相关的所有资源路径,子元素说明参考build/resources/resource元素的说明 -->
<testResource>
<targetPath />
<filtering />
<directory />
<includes />
<excludes />
</testResource>
</testResources>插件管理相关的元素有两个,包括pluginManagement和plugins。pluginManagement中有子元素plugins,它和project下的直接子元素plugins的区别是,pluginManagement主要是用来声明子项目可以引用的默认插件信息,这些插件如果只写在pluginManagement中是不会被引入的。project下的直接子元素plugins中定义的才是这个项目中真正需要被引入的插件。
        <!--------------------- 插件管理 --------------------->
        <!-- 子项目可以引用的默认插件信息。pluginManagement中的插件直到被引用时才会被解析或绑定到生命周期 -->
        <!-- 这里只是做了声明,并没有真正的引入。给定插件的任何本地配置都会覆盖这里的配置-->
        <pluginManagement>
            <!-- 可使用的插件列表 -->
            <plugins>
                <!--plugin元素包含描述插件所需要的信息。 -->
                <plugin>
                    <!--插件定位坐标三元素:groupId + artifactId + version -->
                    <groupId />
                    <artifactId />
                    <version />
                    <!-- 是否使用这个插件的Maven扩展(extensions),默认为false -->
                    <!-- 由于性能原因,只有在真需要下载时,该元素才被设置成enabled -->
                    <extensions />
                    <!--在构建生命周期中执行一组目标的配置。每个目标可能有不同的配置。 -->
                    <executions>
                        <!--execution元素包含了插件执行需要的信息 -->
                        <execution>
                            <!--执行目标的标识符,用于标识构建过程中的目标,或者匹配继承过程中需要合并的执行目标 -->
                            <id />
                            <!--绑定了目标的构建生命周期阶段,如果省略,目标会被绑定到源数据里配置的默认阶段 -->
                            <phase />
                            <!--配置的执行目标 -->
                            <goals />
                            <!--配置是否被传播到子POM -->
                            <inherited />
                            <!--作为DOM对象的配置 -->
                            <configuration />
                        </execution>
                    </executions>
                    <!--项目引入插件所需要的额外依赖,参见dependencies元素 -->
                    <dependencies>
                            ......
                    </dependencies>
                    <!--任何配置是否被传播到子项目 -->
                    <inherited />
                    <!--作为DOM对象的配置 -->
                    <configuration />
                </plugin>
            </plugins>
        </pluginManagement>
        <!--使用的插件列表,这里是真正的引入插件。参见build/pluginManagement/plugins元素 -->
        <plugins>
            ......
</plugins>extensions是在此构建中使用的项目的列表,它们将被包含在运行构建的classpath中。这些项目可以启用对构建过程的扩展,并使活动的插件能够对构建生命周期进行更改。
        <!--------------------- 构建扩展 --------------------->
        <!--使用来自其他项目的一系列构建扩展 -->
        <extensions>
            <!--每个extension描述一个会使用到其构建扩展的一个项目,extension的子元素是项目的坐标 -->
            <extension>
                <!--项目坐标三元素:groupId + artifactId + version -->
                <groupId />
                <artifactId />
                <version />
            </extension>
</extensions>pom文件中通过dependencyManagement来声明依赖,通过dependencies元素来管理依赖。dependencyManagement下的子元素只有一个直接的子元素dependencice,其配置和dependencies子元素是完全一致的;而dependencies下只有一类直接的子元素:dependency。
<dependencies>
	    <dependency>
		    <groupId>junit</groupId>
		    <artifactId>junit</artifactId>
		    <version>4.11</version>
		    <scope>test</scope>
	    </dependency>
</dependencies>| scope取值 | 有效范围 | 依赖传递 | 例子 |
| compile | all | 是 | spring-core |
| provided | compile,test | 否 | servlet-api |
| runtime | runtime,test | 是 | jdbc驱动 |
| test | test | 否 | junit |
| system | compile,test | 是 |
| compile | 默认作用域,在所有classpath中可用,同时它们也会被打包。 |
| provided | 只有当JDK或者一个容器已提供该依赖之后才使用。例如,如果你有一个web应用,你可能在编译classpath中需要可用的servlet api来编译一个servlet,但是你不会想在打包好的war中包含这个servlet api。 |
| runtime | 依赖在运行和测试系统的时候需要,但在编译的时候不需要,比如你可能在编译的时候只需要JDBC API JAR,而只有在运行的时候才需要JDBC驱动实现。 |
| test | 一般在编译和运行时都不需要,它们只有在测试编译和测试运行阶段可用。 |
| system | 与provided类似,但是你必须显示的提供一个对于本地系统中jar文件的路径,这么做是为了允许基于本地对象编译,而这些对象是系统类库的一部分。 |
| import | 常与type pom组合用于依赖多继承 |
system和provided的区别是,使用system范围的依赖时必须通过systemPath元素显式地指定依赖文件的路径。由于此类依赖不是通过Maven仓库解析的,而且往往与本机系统绑定,可能造成构建的不可移植,因此应该谨慎使用。
作用相当于一个对所依赖jar包进行版本管理。
pom.xml
//只是对版本进行管理,不会实际引入jar
<dependencyManagement>
      <dependencies>
            <dependency>
                <groupId>org.springframework</groupId>
                <artifactId>spring-core</artifactId>
                <version>3.2.7</version>
            </dependency>
    </dependencies>
</dependencyManagement>

//会实际下载jar包
<dependencies>
       <dependency>
                <groupId>org.springframework</groupId>
                <artifactId>spring-core</artifactId>
       </dependency>
</dependencies>
如果dependencies中的dependency声明了version,那么无论dependencyManagement中有没有对该jar的version声明,都以dependency里的version为准。
如果dependency里没有version,那么就会到dependencyMangement里面打有没有对该artifactId和groupId进行过版本声明,如果有就使用,如果没有就会报错。
这个分类主要包括两个元素,分别是依赖类型和依赖的分类器。同一个项目,即使打包成同一种类型,也可以有多个文件同时存在,因为它们的分类器可能是不同的。
| type | 依赖类型,默认是jar。通常表示依赖文件的扩展名,但也有例外。一个类型可以被映射成另外一个扩展名或分类器。类型经常和使用的打包方式对应,尽管这也有例外,一些类型的例子:jar,war,ejb-client和test-jar。如果设置extensions为true,就可以在plugin里定义新的类型。 |
| classifier | 依赖的分类器。分类器可以区分属于同一个POM,但不同构建方式的构件。分类器名被附加到文件名的版本号后面,如果想将项目构建成两个单独的JAR,分别使用Java 4和6编译器,就可以使用分类器来生成两个单独的JAR构件 |
依赖传递相关的子元素主要有两个,用于依赖排除的exclusions和设置依赖是否可选的optional。
| exclusions | 排除该项目中的一些依赖,即本项目A依赖该dependency指示的项目B,但是不依赖项目B中依赖的这些依赖; |
| optional | 可选依赖,用于阻断依赖的传递性,即本项目不会依赖父项目中optional设置为true的依赖。 |
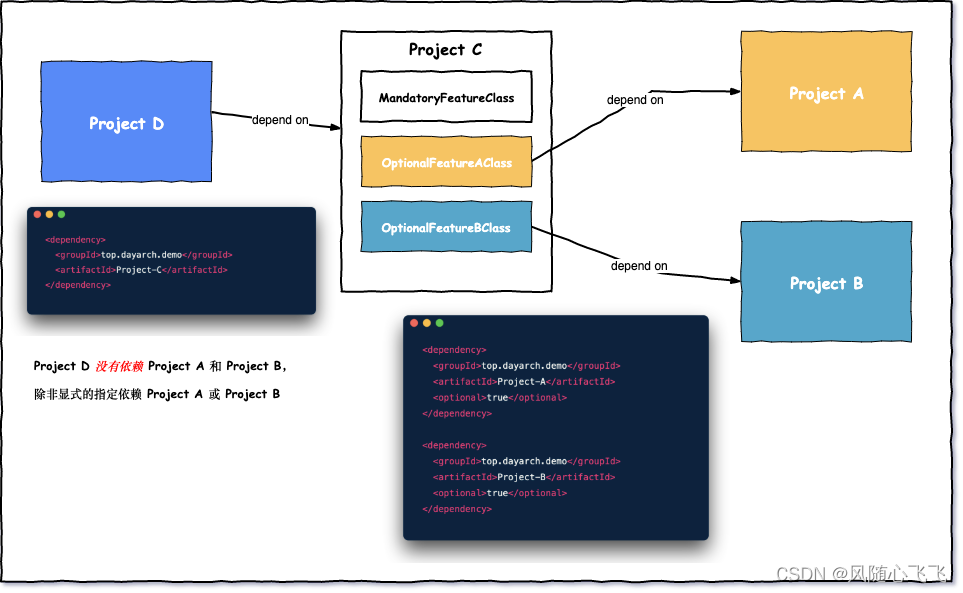
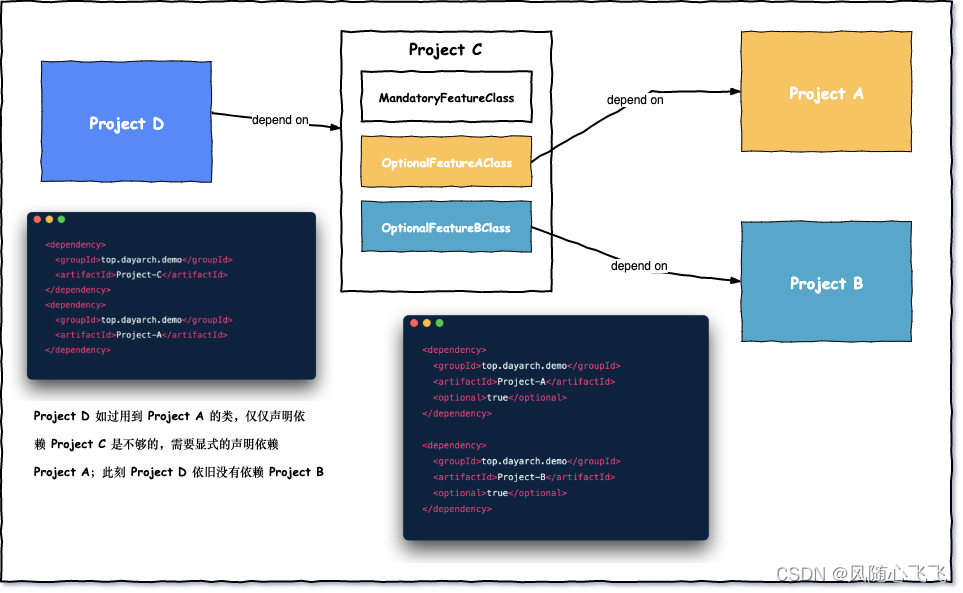
Project C使用了两个来自Project A的类和Project B的类,Project D依赖Project C,如果D没有使用A和B的类,为了让最终的war/jar不包含不必要的依赖,C的自己的引用配置时把A和B设置为optinal。
如果D确实使用的A中的类,则需要在D的引用配置中显示添加A的依赖
现实中最好的使用示例就是数据库持久化框架,它会引入Mysql的驱动,也会引用Oracle的驱动,但是应用项目在使用持久化框架时,往往只用其中的一种数据库。
如果C引用依赖配置时没有加入optional,D只想使用A中的类,可以使用exclusion关键字
<dependencies>
    <dependency>
      <groupId>top.dayarch.demo</groupId>
      <artifactId>Project-C</artifactId>
      <exclusions>
        <exclusion>
          <groupId>top.dayarch.demo</groupId>
          <artifactId>Project-B</artifactId>
        </exclusion>
      </exclusions>
    </dependency>
</dependencies>
<properties>
		<project.build.sourceEncoding>UTF-8</project.build.sourceEncoding>
        <project.build.outputEncoding>UTF-8</project.build.outputEncoding>
		<maven.compiler.source>1.8</maven.compiler.source>
		<maven.compiler.target>1.8</maven.compiler.target>
</properties>
maven提供了三个隐式的变量。
| env | 操作系统的环境变量。 |
| project | pom中的内容 |
| settting | maven的settings信息 |
<properties>
	<junit.version>4.11</junit.version>
</properties>
#使用
<dependency>
	<groupId>junit</groupId>
	<artifactId>junit</artifactId>
	<version>${junit.version}</version>
	<scope>test</scope>
</dependency>远程仓库列表的配置,包括依赖和扩展的远程仓库配置,以及插件的远程仓库配置。在本地仓库找不到的情况下,maven下载依赖、扩展和插件就是从这里配置的远程仓库中进行下载。
需要注意的是release和snapshot两者的区别。release是稳定版本,一经发布不再修改,想发布修改后的项目,只能升级项目版本再进行发布;snapshot是不稳定的,一个snapshot的版本可以不断改变。项目在开发期间一般会使用snapshot,更方便进行频繁的代码更新;一旦发布到外部,或者开发基本完成,代码迭代不再频繁,则推荐使用release。
    <!--发现依赖和扩展的远程仓库列表。 -->
    <repositories>
        <!--包含需要连接到远程仓库的信息 -->
        <repository>
            <!--如何处理远程仓库里发布版本的下载 -->
            <releases>
                <!--值为true或者false,表示该仓库是否为下载某种类型构件(发布版,快照版)开启。 -->
                <enabled />
                <!--该元素指定更新发生的频率。Maven会比较本地POM和远程POM的时间戳 -->
                <!--选项:always,daily(默认),interval:X(X单位为分钟),或者never。 -->
                <updatePolicy />
                <!--当Maven验证构件校验文件失败时该怎么做。选项:ignore,fail,或者warn -->
                <checksumPolicy />
            </releases>
            <!-- 如何处理远程仓库里快照版本的下载 -->
            <!-- 有了releases和snapshots这两组配置,就可以在每个单独的仓库中,为每种类型的构件采取不同的策略 -->
            <snapshots>
                <enabled />
                <updatePolicy />
                <checksumPolicy />
            </snapshots>

            <!--远程仓库唯一标识符。可以用来匹配在settings.xml文件里配置的远程仓库 -->
            <id>nanxs-repository-proxy</id>
            <!--远程仓库名称 -->
            <name>nanxs-repository-proxy</name>
            <!--远程仓库URL,按protocol://hostname/path形式 -->
            <url>http://192.168.1.169:9999/repository/</url>
            <!-- 用于定位和排序构件的仓库布局类型。可以是default或者legacy -->
            <layout>default</layout>
        </repository>
    </repositories>

    <!--发现插件的远程仓库列表,这些插件用于构建和报表 -->
    <pluginRepositories>
        <!--包含需要连接到远程插件仓库的信息。参见repositories/repository元素 -->
        <pluginRepository>
            ......
        </pluginRepository>
</pluginRepositories> <!--项目分发信息,在执行mvn deploy后表示要发布的位置。用于把网站部署到远程服务器或者把构件部署到远程仓库 -->
<distributionManagement>
<!--部署项目产生的构件到远程仓库需要的信息 -->
<repository>
<!-- 是分配给快照一个唯一的版本号 -->
<uniqueVersion />
<!-- 其他配置参见repositories/repository元素 -->
<id>nanxs-maven2</id>
<name>nanxsmaven2</name>
<url>file://${basedir}/target/deploy</url>
<layout />
</repository>
<!--构件的快照部署的仓库。默认部署到distributionManagement/repository元素配置的仓库 -->
<snapshotRepository>
<uniqueVersion />
<id>nanxs-maven2</id>
<name>Nanxs-maven2 Snapshot Repository</name>
<url>scp://svn.baidu.com/nanxs:/usr/local/maven-snapshot</url>
<layout />
</snapshotRepository>
<!--部署项目的网站需要的信息 -->
<site>
<!--部署位置的唯一标识符,用来匹配站点和settings.xml文件里的配置 -->
<id>nanxs-site</id>
<!--部署位置的名称 -->
<name>business api website</name>
<!--部署位置的URL,按protocol://hostname/path形式 -->
<url>scp://svn.baidu.com/nanxs:/var/www/localhost/nanxs-web</url>
</site>
<!--项目下载页面的URL。如果没有该元素,用户应该参考主页 -->
<!--本元素是为了帮助定位那些不在仓库里的构件(license限制) -->
<downloadUrl />
<!--如果构件有了新的group ID和artifact ID(构件移到了新的位置),这里列出构件的重定位信息 -->
<relocation>
<!--构件新的group ID -->
<groupId />
<!--构件新的artifact ID -->
<artifactId />
<!--构件新的版本号 -->
<version />
<!--显示给用户的,关于移动的额外信息,例如原因 -->
<message />
</relocation>
<!-- 给出该构件在远程仓库的状态。本地项目中不能设置该元素,因为这是工具自动更新的 -->
<!-- 有效的值有:none(默认),converted(仓库管理员从 Maven 1 POM转换过来),
partner(直接从伙伴Maven 2仓库同步过来),deployed(从Maven 2实例部署),
verified(被核实时正确的和最终的) -->
<status />
</distributionManagement>二、发布第三方jar到本地库中
mvn install:install-file -DgroupId=com -DartifactId=client -Dversion=0.1.0 -Dpackaging=jar -Dfile=d:\client-0.1.0.jar三、多项目管理
所有具体子项目的pom.xml都会继承总项目的pom的内容,取值为子项目的pom内容优先。
1、首先要在总项目的pom中加入如下配置
<modules>
    <module>simple-weather</module>
    <module>simple-webapp</module>
</modules>
2、其次在每个子项目中加入
<parent>
    <groupId>org.sonatype.mavenbook.ch06</groupId>
    <artifactId>simple-parent</artifactId>
    <version>1.0</version>
</parent> 当然,继承不是唯一的配置文件共用方式,maven还支持引用方式。引用pom的方式更简单,在依赖注入一个type为pom的依赖即可。
多继承可参见:http://1024s.top/mbstudy/mbBlog/blogDetail?blogId=11478
<project>
    <description>This is a project requiring JDBC</description>
    ...
    <dependencies>
        ...
        <dependency>
            <groupId>org.sonatype.mavenbook</groupId>
            <artifactId>persistence-deps</artifactId>
            <version>1.0</version>
            <type>pom</type>
        </dependency>
    </dependencies>
</project><properties>
<maven.deploy.skip>true</maven.deploy.skip>
</properties>
因为子模块会继承属性,所以需要发布的模块就要修改为false
<properties>
  <maven.deploy.skip>false</maven.deploy.skip>
</properties>
maven deploy -N(不会发布子module)
我们在开发过程中,创建了2个以上的模块,每个模块都是一个独立的maven project,在开始的时候我们可以独立的编译和测试运行每个模块,但是随着项目的不断变大和复杂化,我们期望能够使用简单的操作来完成编译等工作。
所谓聚合,顾名思义,就是把多个模块或项目聚合到一起,我们可以建立一个专门负责聚合工作的Maven Project-aggregator。
(1)该aggregator本身做为一个maven项目,它必须有自己的POM。
(2)它的打包方式必须为:pom
(3)引入新的元素:modules-module
(4)版本:聚合模块的版本和被聚合模块版本一致。
(5)relative path:每个module的值都是一个当前POM的相对目录。
(6)目录名称:为了方便的快速定义内容,模块所处的目录应当与其artifactId一致(Maven约定而不是硬性要求),总之,模块所处的目录必须和<module>模块所处的上当</module>相一致。
(7)习惯约定:为了方便构建,通常将聚合模块放在项目目录层的最项层,其它聚合模块作为子目录存在。这样当我们打开项目的时候,第一个看到的就是聚合模块的POM。
(8)聚合模块减少的内容 :聚合模块的内容仅仅是一个pom.xml文件,它不包含src/main/java,src/test/java等目录,因为它只是用来帮助其它模块构建的工具,本身并没有实质的内容。
(9)聚合模块和子模块的目录:他们可以是父子类,也可以是平行结构,当然如果使用平行结构,那么聚合模块的POM也需要做出相应的更改。
我们在开发的过程中,可能多个模块独立开发,但是多个模块可能依赖相同的元素,比如说每个模块都需要junit,使用spring的时候,其核心jar也必须被引入,在编译的时候,maven-compiler-plugin插件也要被引入。
dependencies是可以被继承的,这个时候我们就想到让我们的发生了共同依赖元素转移到parent中,这样我们又进一步的优化配置。可是问题也随之而来,如果有一天我创建了一个新模块,但是这个模块不需要这些parent的依赖,该如何处理?那就是增加一个新的元素dependencyManagement。
<properties>
        <target.version>2.5.6</target.version>
    </properties>

    <dependencyManagement>
        <dependencies>
            <dependency>
                <groupId>your groupId</groupId>
                <artifactId>your artifactId</artifactId>
                <version>${target.version}</version>
            </dependency>
        </dependencies>
    </dependencyManagement>
<dependencies>
<dependency>
<groupId>your groupId</groupId>
<artifactId>your artifactId</artifactId>
</dependency>
</dependencies>子模块的pom继配置的时候,仍然要声明groupId和artifactId,表示当前配置是继承于父pom的,从而直接使用父pom的版本对应的资源。
这个可以有效的避免多个子模块使用依赖版本不一致的情况,有助于降低依赖冲突的几率。
四、maven的使用
usage: mvn [options] [<goal(s)>] [<phase(s)>]

#忽略递归子模块,在父pom目录
mvn clean package deploy -N
# 指定deploy项目,在父pom目录
mvn clean package deploy -pl


Options:

 -am,--also-make                        If project list is specified, also

                                        build projects required by the

                                        list

 -amd,--also-make-dependents            If project list is specified, also

                                        build projects that depend on

                                        projects on the list

 -B,--batch-mode                        Run in non-interactive (batch)

                                        mode (disables output color)

 -b,--builder <arg>                     The id of the build strategy to

                                        use

 -C,--strict-checksums                  Fail the build if checksums don't

                                        match

 -c,--lax-checksums                     Warn if checksums don't match

 -cpu,--check-plugin-updates            Ineffective, only kept for

                                        backward compatibility

 -D,--define <arg>                      Define a system property

 -e,--errors                            Produce execution error messages

 -emp,--encrypt-master-password <arg>   Encrypt master security password

 -ep,--encrypt-password <arg>           Encrypt server password

 -f,--file <arg>                        Force the use of an alternate POM

                                        file (or directory with pom.xml)

 -fae,--fail-at-end                     Only fail the build afterwards;

                                        allow all non-impacted builds to

                                        continue

 -ff,--fail-fast                        Stop at first failure in

                                        reactorized builds

 -fn,--fail-never                       NEVER fail the build, regardless

                                        of project result

 -gs,--global-settings <arg>            Alternate path for the global

                                        settings file

 -gt,--global-toolchains <arg>          Alternate path for the global

                                        toolchains file

 -h,--help                              Display help information

 -l,--log-file <arg>                    Log file where all build output

                                        will go (disables output color)

 -llr,--legacy-local-repository         Use Maven 2 Legacy Local

                                        Repository behaviour, ie no use of

                                        _remote.repositories. Can also be

                                        activated by using

                                        -Dmaven.legacyLocalRepo=true

 -N,--non-recursive                     Do not recurse into sub-projects

 -npr,--no-plugin-registry              Ineffective, only kept for

                                        backward compatibility

 -npu,--no-plugin-updates               Ineffective, only kept for

                                        backward compatibility

 -nsu,--no-snapshot-updates             Suppress SNAPSHOT updates

 -ntp,--no-transfer-progress            Do not display transfer progress

                                        when downloading or uploading

 -o,--offline                           Work offline

 -P,--activate-profiles <arg>           Comma-delimited list of profiles

                                        to activate

 -pl,--projects <arg>                   Comma-delimited list of specified

                                        reactor projects to build instead

                                        of all projects. A project can be

                                        specified by [groupId]:artifactId

                                        or by its relative path

 -q,--quiet                             Quiet output - only show errors

 -rf,--resume-from <arg>                Resume reactor from specified

                                        project

 -s,--settings <arg>                    Alternate path for the user

                                        settings file

 -t,--toolchains <arg>                  Alternate path for the user

                                        toolchains file

 -T,--threads <arg>                     Thread count, for instance 2.0C

                                        where C is core multiplied

 -U,--update-snapshots                  Forces a check for missing

                                        releases and updated snapshots on

                                        remote repositories

 -up,--update-plugins                   Ineffective, only kept for

                                        backward compatibility

 -v,--version                           Display version information

 -V,--show-version                      Display version information

                                        WITHOUT stopping build

 -X,--debug                             Produce execution debug output
| validate | 验证项目是否正确 |
| comile | 编译项目的源代码 |
| test | 使用合适的单元测试框架运行测试,这些测试应该不需被打包或发布。 |
| package | 将编译好的代码打包成可分发的格式。 |
| verify | 执行所有检查,验证包是否有效,符合质量规范。 |
| install | 打包可执行jar包(war包或其它形式的包),并布署到本地maven仓库,但不会部署到远程maven仓库。 |
| deploy | 打包可执行jar包(war包或其它形式的包),同时部署到本地和远程的maven仓库。 |
| -pl | 全称不是--projects,选项后可跟随{groupId}:{artifactId}或者所选模块的相对路径(多个模块以逗号分隔),这样可打包指定模块。 |
| -am | -also-make,需要与-pl一起使用,表示对-pl指定的模块所要依赖的工程也打包。 |
| -amd | -also-make-dependents,需要与-pl一起用,表示对依赖于-pl指定的模块的工程也打包. |
五、profile
maven提供了一种针对不同环境参数“激活”一个profile的方式,这就叫做profile激活。如果该profile被激活,那么它定义的所有配置都会覆盖原来pom中对应层次的元素,就像使用命令参数-P引入该profile一样。
1、pom.xml中的profiles元素,它包含了一个或者多个profile元素。由于profile覆盖了pom.xml中的默认设置,profiles通常是pom.xml中的最后一个元素。
每个profile必须要有一个id元素。这个id元素包含的名字将在命令行调用profile时被用到。我们可以通过传给Maven一个-P <profile_id>参数来调用profile。
你可以基于一个属性如environment.type的值来激活一个profile。当environment.type等于dev的时候激活development profile,或者当environment.type等于prod的时候激活production profile。你也可以通过一个属性的缺失来激活一个profile。下面的配置,只有在Maven运行过程中属性environment.type不存在profile才被激活。例如:
    <!--在列的项目构建profile,如果被激活,会修改构建处理 -->
    <profiles>
        <!--根据环境参数或命令行参数激活某个构建处理 -->
        <profile>
            <!--构建配置的唯一标识符。即用于命令行激活,也用于在继承时合并具有相同标识符的profile。 -->
            <id />
            <!--自动触发profile的条件逻辑。Activation是profile的开启钥匙,profile的力量来自于它 -->
            <!-- 能够在某些特定的环境中自动使用某些特定的值;这些环境通过activation元素指定。activation元素并不是激活profile的唯一方式 -->
            <activation>
                <!--profile默认是否激活的标志 -->
                <activeByDefault />
                <!--当匹配的jdk被检测到,profile被激活。例如,1.4激活JDK1.4,1.4.0_2,而!1.4激活所有版本不是以1.4开头的JDK -->
                <jdk />
                <!--当匹配的操作系统属性被检测到,profile被激活。os元素可以定义一些操作系统相关的属性。 -->
                <os>
                    <!--激活profile的操作系统的名字 -->
                    <name>Windows XP</name>
                    <!--激活profile的操作系统所属家族(如 'windows') -->
                    <family>Windows</family>
                    <!--激活profile的操作系统体系结构 -->
                    <arch>x86</arch>
                    <!--激活profile的操作系统版本 -->
                    <version>5.1.2600</version>
                </os>
                <!--如果Maven检测到某一个属性(其值可以在POM中通过${名称}引用),其拥有对应的名称和值,Profile就会被激活 -->
                <!--如果值字段是空的,那么存在属性名称字段就会激活profile,否则按区分大小写方式匹配属性值字段 -->
                <property>
                    <!--激活profile的属性的名称 -->
                    <name>mavenVersion</name>
                    <!--激活profile的属性的值 -->
                    <value>2.0.3</value>
                </property>
                <!--提供一个文件名,通过检测该文件的存在或不存在来激活profile。missing检查文件是否存在,如果不存在则激活profile -->
                <!--另一方面,exists则会检查文件是否存在,如果存在则激活profile -->
                <file>
                    <!--如果指定的文件存在,则激活profile。 -->
                    <exists>/usr/local/abcd/abcd-home/jobs/maven-guide-zh-to-production/workspace/
                    </exists>
                    <!--如果指定的文件不存在,则激活profile。 -->
                    <missing>/usr/local/abcd/abcd-home/jobs/maven-guide-zh-to-production/workspace/
                    </missing>
                </file>
            </activation>

            <!--构建项目所需要的信息。参见build元素 -->
            <build />
            <!--发现依赖和扩展的远程仓库列表。详情参见repositories元素 -->
            <repositories />
            <!--发现插件的远程仓库列表,这些插件用于构建和报表。详情参见pluginRepositories元素 -->
            <pluginRepositories />
            <!--该元素描述了项目相关的所有依赖。 详细配置参见dependencies -->
            <dependencies />
            <!--该元素包括使用报表插件产生报表的规范。当用户执行"mvn site",这些报表就会运行。在页面导航栏能看到所有报表的链接。参见reporting元素 -->
            <reporting />
            <!--参见dependencyManagement元素 -->
            <dependencyManagement />
            <!--参见distributionManagement元素 -->
            <distributionManagement />

            <!--不赞成使用. 现在Maven忽略该元素. -->
            <reports />
            <!--模块(有时称作子项目) 被构建成项目的一部分。列出的每个模块元素是指向该模块的目录的相对路径 -->
            <modules />
            <!--参见properties元素 -->
            <properties />
        </profile>
</profiles>用户可以在以下四个地方配置Profile:
(1)pom.xml
(2)profiles.xml
(3)~/.m2/settings.xml
(4)Maven_Home/conf/settings.xml

